If you are into arts or crafts you may be familiar with collages. Layering various materials to achieve what ever idea you have in mind.
Many think of art as creative expression. A way that some can “work through” various issues they have emotionally. I’m sure some do. I never thought of art as a way to express myself. If I did I’m sure I would create much more and very different art than I usually do.
I just love collages. I enjoy seeing others ideas and hoping something touches me. Personally I create any art with beauty in mind be it visual, music, dance, etc. Some modern art is downright ugly and offensive. I don’t care if it is someone’s expression, if it’s ugly I don’t want to see it.
Some things can be a mess to some and I might like it. Then there could be another mess that actually looks like a mess to me but someone else gets it.
I have always been enamored with the Old Masters. They were perfection. They had talent and went for realism. Then came the sloppier impressionists. They helped bring about what I call “crap on canvas.”
Speaking of which, I do love my collages. The ones from altered books, pages, pictures, paints, papers, lace & anything else you can glue on.
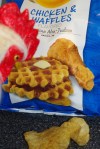
This was one I layered from various photos to look hand made. Usually when I create layered photos I have a different technique, similar to the one below which might be various flowers with complementary colors layered on an enhancing background.
I am either closing up shop for a while or making some changes on the site for sure.
mug & bell some secret Santa left outside my apartment with candy at Christmas.
I’m working on various craft projects right now because I’m still downsizing, discarding and donating and came across supplies purchased years ago for whenever. I’m not even sure why I purchased them at the time.
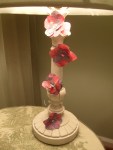
I found a small plastic globe this year at the dollar store and created a light by decoupaging some pressed flowers on it and inserting a light for another dollar. Very lightweight and cute.
I had various wooden plaques and frames I’ve never used, found some plaster of Paris angels and cupids I was going to adhere to furniture at one time but changed my mind so I painted and decoupaged some of it. This is the first time in a long time I have even felt like doing much of anything.
I painted 2 5 x 7 baseboards, 2 wooden plaques approximately 4 x 6 and a wooden cross with a gold based paint. I purchased it many years ago and you can’t get this quality in hobby paints anymore. You can get the wood pieces at various craft and hobby stores. Not sure if the dollar store carries anything like this but you can always check. I used some tissue paper to decoupage on each piece.
If you like to do various decoupage or paper art, it’s nice to shop various specialty gift shops for unique tissue designs such as the paper I used. Most stores and Hallmark shops don’t carry very interesting patterns as a rule but always check when you shop.
Not sure what my original plans were for these plaster figurines, but I decided to paint them all gold as well to use in my projects. I had seen a unique furniture piece years ago with cupid figures and decoupage, but since I don’t have a piece of furniture in mind to use them on, I created these out of the pure boredom of being snowed and frozen inside for now. -45 wind chill and almost a foot of snow within a week. Yikes, then supposed to go up to 50 above in a couple of days. Madness!
I adhered a couple of the cupids on solid gold plaques and two others on the decoupaged plaques I planned on adhering on the tissue covered backing boards for contrast. The tissue does have flecks of gold throughout making it a great choice. I then adhered the larger angel which was a broken Christmas ornament that I had kept when the hanger at the head broke off.
Basically finished. Just not sure what I’m doing with them. The set of three can be used on a mantle or wall art in a grouping. The cross went on a painted plaque and the cupids on backer boards were just slid into matching painted frames.
So if I do continue blogging I will be changing the format and style depending on if I move and what I end up doing. I will continue ONLY if I have something worth blogging about. Something creative, tips, ideas, something that is not just a time waster for all involved.
Thank you for following my blog all these years. God bless.
When I think of patterns, I think of sewing right off the bat. Some could think of a pattern of conduct or behavior, I think of it as something that repeats on wallpaper or on a piece of patterned cloth that you would cut out a pattern from.
A while back I worked for a major decorating company for a number of years. The majority of the time I worked as a vendor representative with many companies from drapery and curtains to wallpaper and rugs and everything in between. It was a very fulfilling and creative time in my life. Unfortunately I chose to leave it for more money somewhere else. A place where there were no patterns except for those evading their taxes. There was a similar pattern in that respect.
Please see the short video I prepared to walk you through the way I created a flat panel from cotton muslin to hang on a cafe curtain in my tiny bathroom which previously had 2″ window blinds that stuck out when you opened them. I wanted to try something different so instead of just painting everything freehand on my panel, I found some colorful fish in my PhotoDraw clip gallery that I printed separately onto vellum/frosted paper. It’s a nice texture to print from. You can get them in the printer paper area or cheaper in scrap booking or paper craft area of any hobby or office store.
I placed pins to mask the general area for the fish patterns to go and used my inkjet printer to print directly on the sheets. You may have to place masking tape along the feed edge so the printer can see it. My printer is fussy with certain papers. You can see it on the transfer paper when I lay it inkside down on the fabric after I coat the area with gloss, semi-gloss or matte medium, liquid or gel. I have used them all with similar results. Don’t over saturate, but use enough. Experiment on scrap fabric before you ever start an actual project you care about to see the various effects you get from each type of transfer medium and what you prefer.
After I place the transfer ink side down on the medium I burnish the back of the entire picture with a plastic utensil I have. Many use a bone folder you can get at crafting stores. Don’t press too hard, but hard enough to push all the ink into the fabric from the paper. I use vellum because it does not come apart from the medium like other papers can do. It’s almost plastic like in texture. You will see that if you have used too much medium, the colors will squish out all over and the picture will blur and not look as good. Again, experiment for a while first.
Once I think that the transfer has been complete, I carefully lift up the paper and let it dry for at least a day. I don’t rush my drying when I need it completely dry. After that I hand painted various corals, plants and sea horses. I would have used a transfer for the seahorses as well but they were an after thought so I didn’t bother because I had already started some painting with acrylics. If you need to thin the paint you can use water or more medium depending on the thickness and intensity of color you wish to have.
Naturally I measured the panel and had all the edges finishes and sewed my rod pocket at the top to allow for the cafe rod, which is very small. Please see some of the finished pictures as well for an idea of how this looked from the outside of the window at night.
My quest is to have the best blogs I can from this day forward. Now let’s see if I keep that promise. My goal had always been to provide needed information to others regarding many aspects of living in todays very confusing world, with a little entertainment and pretty pictures.
I want to give others ideas and shortcuts to living in a world that will rob you blind spiritually as well as financially. It was supposed to give definite tips to save money, offer suggestions to solve various lifestyle issues such as cooking, cleaning, decorating, gardening and crafting. I have really fallen short in this area because as my mother used to say “obviously, it’s too much like work” now.
The fact that Eight o’clock coffee 100% Colombian Peaks is a better tasting coffee than Starbucks for a much lower price.
That this was not a great flavor and too high in sodium, don’t waste your money.
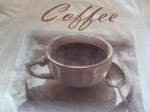
How to make this cute Coffee Tshirt!
Even though I have experienced the joys of motherhood myself, it was so many years ago this is definitely not a “mommy blog.”
The only time he sucked his thumb! Never sucked fingers or a pacifier, he liked to cry.
Wearing dad’s Tshirt. this one never cried as an infant.
Two little boys, different as day and night!
I plan to have more recipes, gardening tips and photo enhancement tips from Photoshop, which I seldom use, Microsoft Photodraw the first photographic software I purchased and still us even though support stopped many years ago to Ulead PhotoImpact which has awsome particle effects like lighting and fog.
Keep watching for an actual Recipe page coming soon!
Enhanced Japanese Iris
Picture of the old Wilcox house in Plymouth Michigan. Enhanced with fog, light and color.
Thank you all for your patience and I hope you will enjoy the new, improved Po’ Girl Shines. I owe my faith and hope to Jesus. God bless you all. Peace to you all.
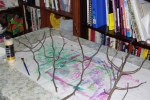
I was fooling around with a glue gun tracing the leaf transfers that I adhered on canvas with acrylic medium. Canvas painted a very dark blue with the idea to manipulate pictures of leaves I had taken and scanned in the fall.
I thought about how the blowing leaves do not float down perfectly in the sky, but swirl and twirl all over the place before they land. First using Microsoft PhotoDraw, Distort Effect Twirl and fine tuning or adjusting the setting or the amount of the twirl of the leaf I applied it to each leaf separately to create the desired effect.
I verified the size leaves needed for the canvas size of 16 x 20. Wishing to show the effect of blowing leaves, but totally experimenting because I had not done these techniques before, I printed some of the leaves on regular printer paper, some on transfer paper and some on tracing paper just to see the finished look after fusing them to the canvas. I carefully cut each leaf out and auditioned them around for a while until I was satisfied. After the Liquitex Matte Medium dried thoroughly, I painted over each of the leaves with various shades of metallic harvest colors, enhancing the original color of the actual leaves. The actual transfer paper had the most pronounced leaf veins show through the paint, followed by the ones I printed on high quality printer paper. I actually preferred the effect that the tracing paper leaves had after painted. The base is so thin that the canvas outline came through in spots giving it a more textured appearance, which I preferred.
Looked boring so I decided to jazz it up by outlining it with a glue gun, painting over the glue ridges with the same shades of metallic paint and once completely dried, used metallic rub in a lighter shade of gold over the leaves and some of the canvas leaving streaks, enhancing the idea of blowing wind.
It’s ok, still have a lot to learn, but practice makes perfect. Please see the following slide show for more details.
This slideshow requires JavaScript.
The next gallery shows a few shots from some other collages I’m working on including one created for Christmas to reflect all the freaking snow we keep having this year!
Deer silhouette with snowflakes, enhanced with glue and painted.
The lighter green is crushed eggshell for texture effect. Spotting effect was created by dropping alcohol 91% proof.
Leaf shapes enhanced with glue and paint
Leaf
Another leaf.
8×10 practice canvas board.
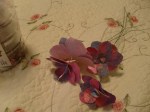
Glue gun enhanced wood frame, painted for altered photo of violas.
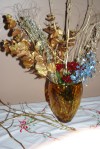
Painted gold paint on small branches/twigs found in the yard.
Inserted them with some 1/2 price Christmas sprigs from the home deco store into a vase.
Wapped the branches with battery operated string of 35 lights.
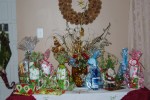
Placed the smaller gifts around the Christmas arrangement to finish the scene.
You don’t have to purchase special Christmas decor for the mantle or buffet. I usually try to set up a centerpiece of some kind so I can place some of the smaller gifts around it in a decorative fashion. Looks all Christmassy until the gifts are given out, then who cares? This is great to do if you don’t want to go to the trouble, expense or have the room for a full size tree.
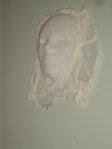
Looks pretty good by itself, no additional paint or embellishment.
Hung the mask plain right after drying to see the effect.
Added bronze metallic paints.
Enhanced with some gold paint.
Cloth masks using a plastic face mask as the base with white gauze and glue.
Adhesive is half white glue like school or Elmer’s and half very warm water mixed.
Two pieces 10″ x 14″ of any thin, gauzy fabric to layer and shape to the mask after thoroughly coating with the glue.
Layering, one at a time, smooth each one in place to the base. Set in the eyes and shape up the nose area. layer the edges to your preference.
Used this mask for a Native American Theme with leaves, feathers and beads and a scroll that was transferred to fabric and melted around the edges.
This mask has one layer fabric for base and layed with colored tissue paper. Painted the base canvas board to compliment the mask colors and shapes, added grapes as per mask and picture of wine and glasses.
These pieces are still in progress, will up date later when completed.
Decided to use the leftover top of my old jeans that were left over from my garden jean cap that I previously made and posted the instructions on the instructables.com web site.
I was able to make a purse and a pillow. I posted the instructions on how these were made on the Instructables web site if you wish further information on how to make these items. Please feel free to play with any of the ideas on this site and be as creative as you wish.
I am also posting the pictures of an apron that I enhanced with leftover fabric that was purchased and a craft store on clearance for $1.75. I was also able to make a matching wine sack and plan on using it for a gift after adding a bottle of wine from a local winery.


You must be logged in to post a comment.